Vista Flash Menu provides huge collection of 1400 web buttons, 6600 icons, 300 ready-made samples, so you'll create really nice looking menus and buttons with little or nodesign skills at all! Web 2.0, Mac, iPhone, Aqua buttons, Vista, XP, transparent, round, glossy, metallic, 3d, tab menus, drop down menus will be a breeze!
Use images for backgrounds of submenus and items, icons, arrows. Using web images you can create menus completely based on graphics. Design both horizontal and vertical menus and submenus with any amount of menus on a single page. Place any HTML code inside the menu item - be it a flash-object, form, picture, or text. This ability lets you to build various menus of any complexity.
Features
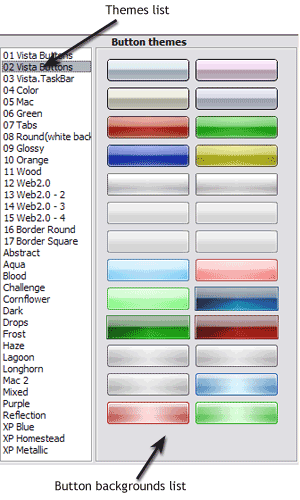
Ready to use button templates and submenus themes. In the Themes toolbox you can choose selected buttons and submenu themes for web appearance.
Menu Frame Flash Save project. Save your image buttons as html You can save current project in the project file (*.xwb) or into the HTML file (*.html).
Flash Sliding Frame Navigation Menu Tutorial Text-based menu You can create a menu with text-based top items. Such menu will be loaded more quickly on your website (in comparison with image-based navigation). Menu structure is comprised of HTML nested UL and LI tags. Standards compliant menu structure is simple to customize and update.
Tutorial Flash Menu Slide Horizontal Flash Buttons Download Search Engine Friendly Vista Flash Menu generates html code which is transparent to search spiders.
Orientation of the Menu Create both horizontal and vertical menus and submenus with any amount of menus on one page.
High Quality and Professional Results You don't have to know HTML, JavaScript, CSS or any other coding languages to make multi-state rollover web buttons, professional cross-browser, search engine friendly DHTML menus. All you have to do is make some clicks and adjust buttons as you wish for them to appear. Vista Web Buttons will generate all necessary images, html, javascripts, css styles automatically!
In the Themes toolbox you can choose selected buttons for web appearance. Click theme name to open it. The theme's available button backgrounds will appear in the Button backgrounds list.
You can check how a background responds to the mouse events without applying it. To do so just move mouse over/click the background.
To apply chosen background, just double-click it. Selected buttons' appearance will change.


 (please include template name in the message title)